


Currently a WIP
Have you checked out desk chair prices? You can go to a big-box store, like Staples, and get something inexpensive but then you sacrifice on the quality and ergonomics of the fabled brands- Steelcase, Herman Miller, etc. Maybe you'll get lumbar suppoert, if you're lucky. And you can forget about anything to actively manage temperature; cold in your office? Time to put a spaceheater under your desk. Hot day? Desk fan. All auxillary solutions.
I was browsing and thought Surely, there must be a better option?
After reminding myself that my name isn't Shirley, I thought to myself a car seat is one of the ultimate seats we've invented. Designed for long hours of sitting without much movement, and electric controls are included in most now- even lumbar support! Furthermore, car designers solved the temperature issue decades ago with seat fans and heaters.
Some companys sell something kind-of like this, but who wants a racing seat? Luxury cars are the ones who invest millions in seat design so they're the last name in comfort. So thus began my trip down a rabbit hole- my desk chair must be a car seat.

The first question I've been asked is Where did you find a car seat? Well, Facebook Marketplace came to the rescue! I was able to pick up a pair (yes, 2) of well-worn but perfectly functional Lexus car seats. Not only are these from the golden years of Lexus quality and comfort (i.e. thick leather and soft padding), they're heated and cooled!
What was there to figure out and make this all work?
> Getting 12v to the seat controls (motors) for electric adjustability
> Hooking up the heated seat pads
> Getting the seat ventilation function working
Now, the first one was easy. There's two large wires in the harness underneath the seat, a suitable (higher power) 12v adapter from Scamazon had those working quickly. But that's where the easy part ended.
As of right now, there's two "versions" of this char. V1 was more experimental and is much rougher. Both have working heating and cooling functions, but they're vastly different in operation. As for the frames to being them to a more suitable height, V1 is the only one mounted on a frame (as it has been too cold to cut a new one in the garage, and I'm going to spend more time on V2's frame to make it the cleanest).


Chair V1
Chair V1 has no computerization, there's toggle switches for the heating/ventilation power and a rotary to control the fan speed. This is cumbersome as the seat heater can't stay on indefinitely else it will trip a thermal fuse. Describing this setup as 'janky' would be overly polite.
Chair V2
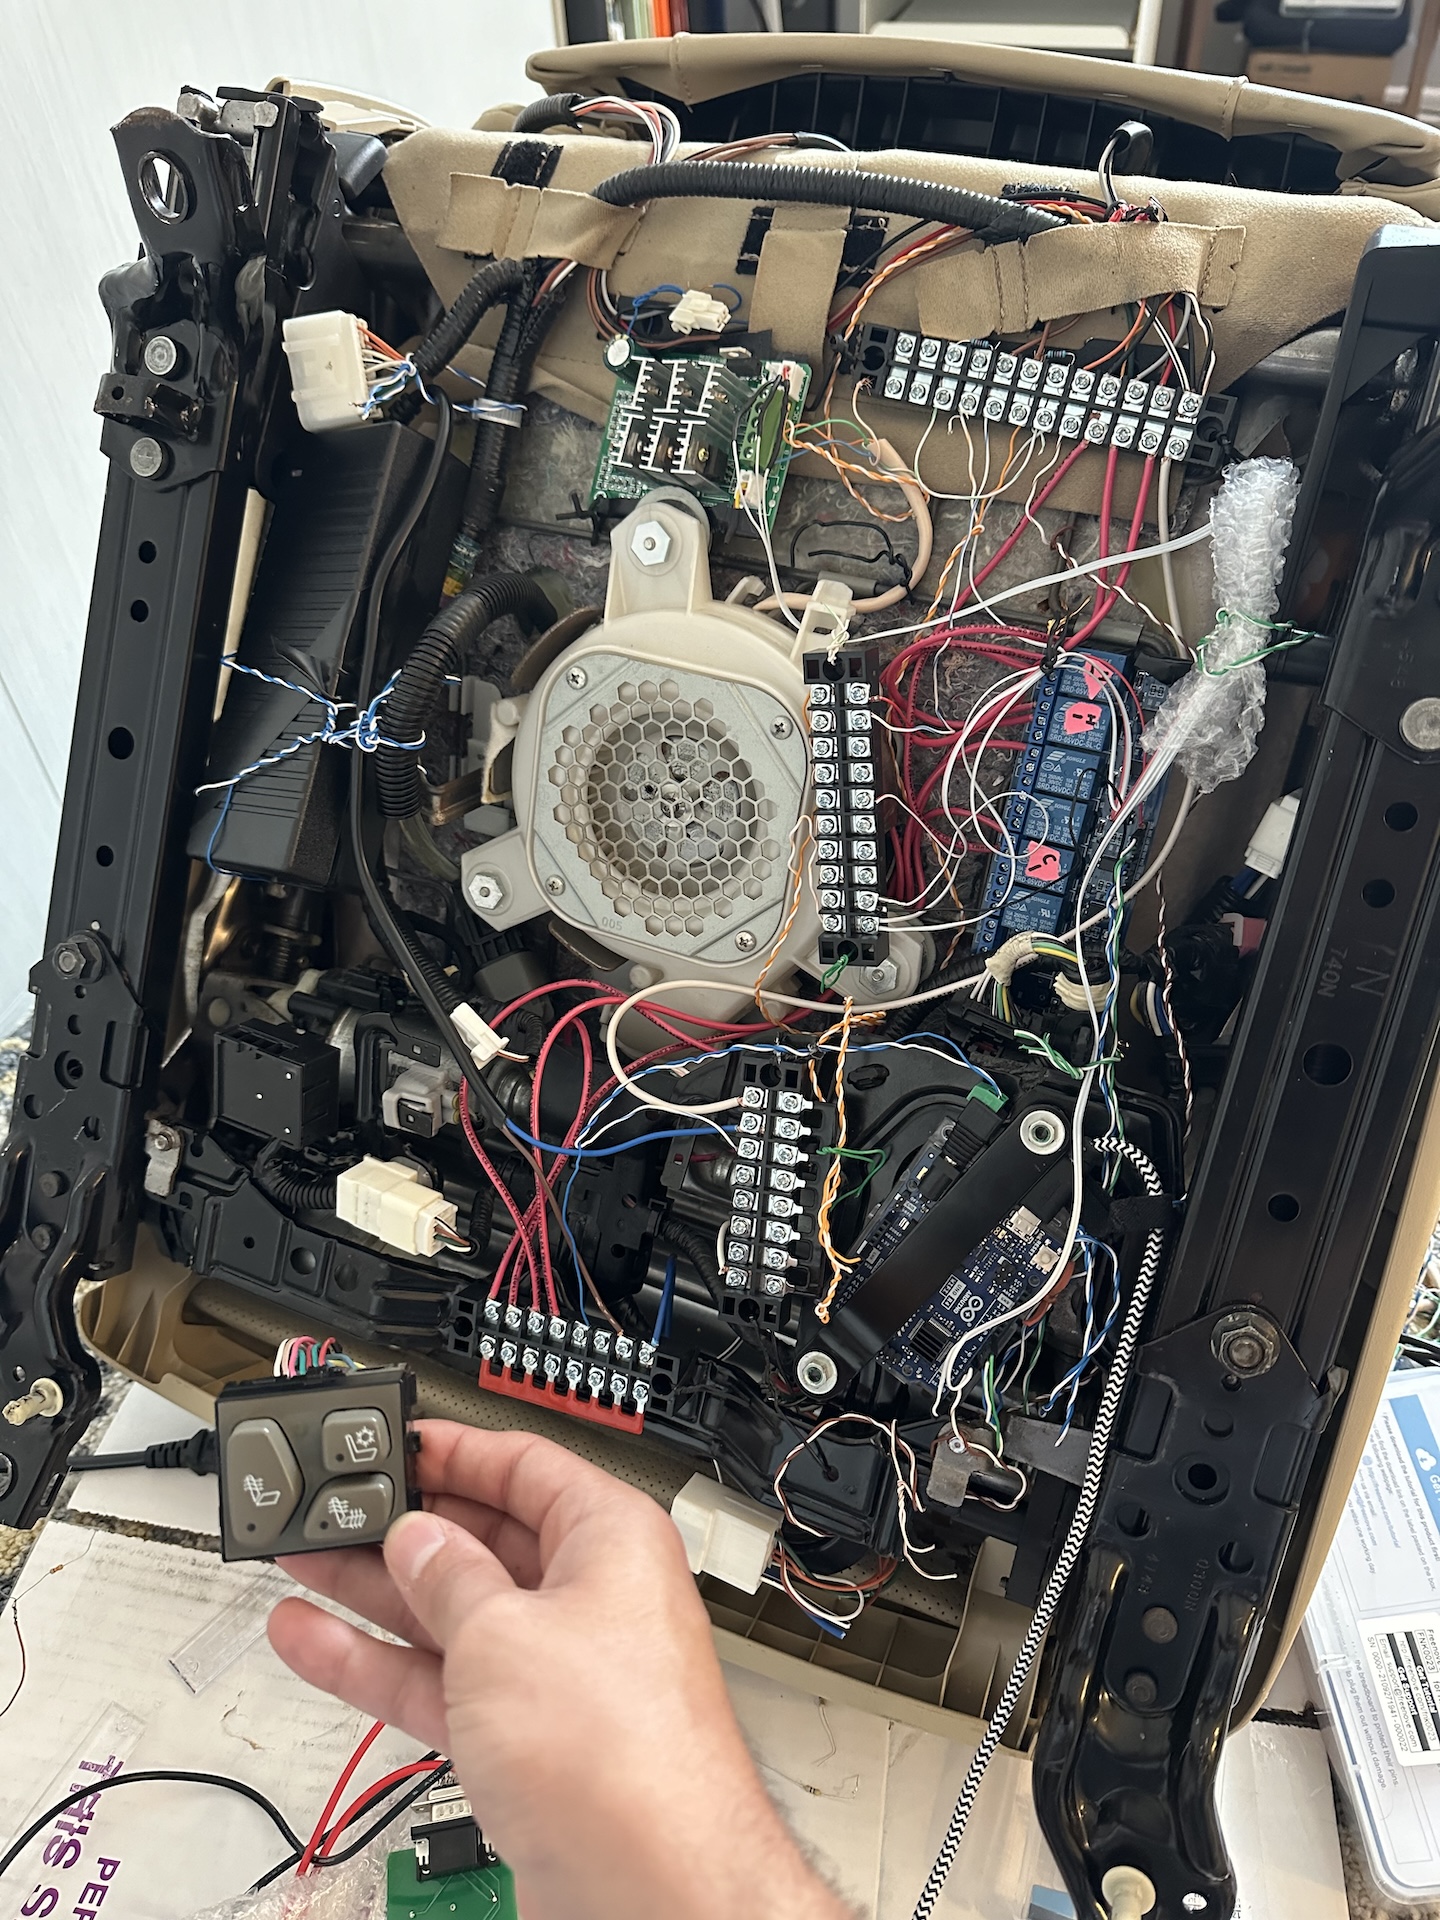
Chair V2s controls were completed this month. It features an Arduino controlling the seat back & seat bottom heating independently, so you can just heat your back when you want to be relaxed but not warmed up overly so. It reads from temperature sensors built into the seat foam to keep the warmth within a user-selected range. Similarly, the seat ventilation fans are controlled by it as well.
Getting more technical: there are a few power rails you can see in the photo. Towards the bottom are the appropriately colored +/- for 12v power. The newer Arduino R4 can run on this directly. Towards the middle there's a terminal block that is split into two halves for 5v +/- power, as some devices like the temperature sensors and relay board run on a lower voltage. At the top is a terminal block for easier connections to some of the various components built into the seat.
Devices used in this project:
The aforementioned Arduino is the brain. Built into the seat are temperature sensors which connect to it directly. The heated seat pads and ventilation fan 12v power is then controled via a relay board. The seat bottom fan is a brushless 3-phase DC motor, so it required a new controller; this controller originally expects an knob-based poteniometer to control the speed, so in order for the Arduino to manage vary this a digital potentiometer receives commands and varies it's resistance as needed. The fan built into the seatback is a more typical 12v computer-case style fan that accepts 5v PWM control directly from the arduino.But I can hear the clamoring, how does the user control this?
By a serial connection! Kidding, but that is something I did during testing. The only UI is a seat heating control button panel from a ~2005 Cadillac. I chose this control as it has all the buttons and indicators built into a single panel, but the control itself has no intelligence built into it. All of the buttons and lights have a single pin that corresponds to them, so it was very easy to re-use (after much trial and error).
The Cadillac control in action
What's left to do?
Just to mount the button panel onto the seat base and build the frame for this chair (once things are consistently warmer). I have plenty of leftover aluminum from V1, and it has proven strong enough to support it without any issues.Late 2024 Update:
The longer wiring for the controller I soldered together is pretty awful, meaning that the voltage spike from pressing buttons isn't clean or reliable. That plus the lack of working interrupts on the R4 is making the control very laggy/unresponsive. Otherwise things work well and the frame is on a base that's sturdier than v1. I put the code on my github with a very bad diagram of how it works. I'm going to get a 5v power adapter in the seat so that an R3 can be swapped in, as the interrupts were working reliably in that implementation.The seat controller actually controlling.
Questions? Comments? Etc? Contact me and let me know!
Keywords: Lexus, Car Seat, Desk Chair, DIY